Category Archives: Technology

Nexpose Install Guide and Review with Nessus

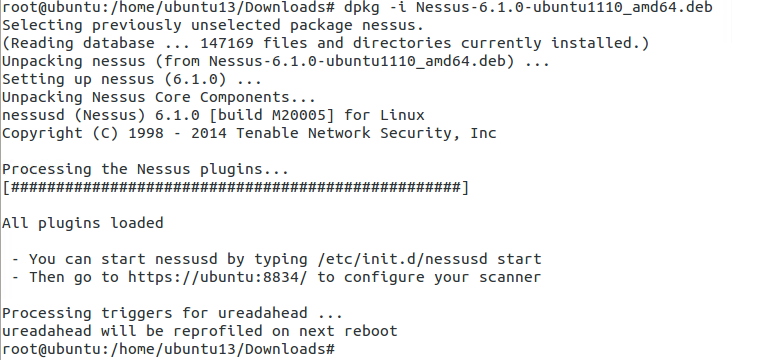
My last blog post was related to setting up Nessus home edition scanner for your lab to do testing. Nessus is properly what I am most familiar with and I like it. I also have some experience using Qualys scanner but it has been couple years since I have used it. However, the scanning technology that I have only heard of but never actually used is Nexpose. So for that reason, I figured I give it a try.

Similar to other commercial scanning technologies, there is a community edition of Nexpose that you can download in your home lab for testing from here.

They have a pretty straightforward user/installation guide here, which I followed in my installation. But just in-case, here is the high-level overview of how I did my setup.

  • Selected the VMWare Virtual Appliance option of the Community Edition
    • Completed the online forum and received the activation code in the email
    • The download contains 1.02GB of .ova file called NexposeVA.ova
  • I opened that file using VMWare Workstation
    • Please note that by default, it allocates 8GB of memory, 2 processors and 160GB of disk space. So, please modify these settings if you do not have those resources available before you power-on the VM.
  • After the VM completely boots, you will login using the following credentials: login: nexpose password: nexpose (please change this)
    • If you just want to complete the most basic setup and want to get up and running immediately without messing with any of the advanced configurations or upgrades, the only configuration you need to do is networking. The virtual appliance is set up in bridge mode by default and should be able to get you an IP automatically. But if you need to give it static IP then you will have to do that manually.
  • At this point, you are pretty much done with the setup. You will be able to complete the rest of the setup by accessing your Nexpose instance by typing following in your browser: https[:]//[VM-IP-Address]:3780
    • The default username for the web interface is: nxadmin and the password is: nxpassword
    • After your first login, the initialization process will take some time. For me, it was about 5-7 minutes.

Continue reading

Tagged , , ,

nessus installation guide linux

Unfortunately, after my last CDR post  – for some unrelated reason, I had my main lab system crash and now I have to rebuild most of the different lab machines that I had before. Obviously, this is a little frustrating because I had everything set up the way I wanted it and now I have to pretty much start from scratch. But to make this rebuilding process more pleasant and productive, I think I am going to document and share some of the labs that I am going to build. Most of these are going to be pretty simple to set up without much difficulty using VMware Workstation. I am not going to go over setting up VMware Workstation since there are already a ton of YouTube videos on it.

First, we are going to select the platform that we are going to use for most of these machines – our choice: Ubuntu 13 Desktop.

The first tool that we are going to install is the Nessus vulnerability scanner. In the first CDR project, we used Nessus as one of our reconnaissances tools along with Nmap. However, this tool can be used in just your lab or home network for identifying vulnerabilities in your systems.

We are going to be installing the latest version of Nessus v6 Home – as of this post. For the operating system, we will choose Ubuntu 11.10, 12.04, 12.10, 13.04, 13.10, and 14.04 AMD64 and download the .deb package.

Here are the sequence of commands after you have downloaded the package and opened the appropriate download directory in the terminal.

Nessus_installationWe are pretty much done. The only thing you need to check is if the Nessus service is running. Usually, it starts automatically but you can verify by running: service nessusd status. If the output shows stopped then simply run the following to start it: service nessusd start.

After above, open your browser and type your IP and port 8834. You can find your IP address by running ifconfig in your terminal. My IP address on this machine is 192.168.244.178.

LocalIP

You should get a similar page as above. Follow through the prompt and in a couple of screens you will have the option to create an initial account for your Nessus scanner. After that, you will need to provide Plugin Feed Registration. For home use, you can request the activation code by completing the following: http://www.tenable.com/products/nessus-home

After completing all the steps thus far – you are done with installing your Nessus scanner. Now you need to configure your scans. Following are the basic steps to configure a scan:

New Scan > Basic Network Scan > [Complete General Page with the Name of the Scan and the target IPs]. On the left side, you have additional scan options that you can play around with. After you are done with making your selections, simply hit save and your scan will automatically start. The scan duration depends on the number of IPs that you are scanning and if they are credentialed or non-credentialed.

After your scan completes you will be able to see the scan results and drill down on each host to see the details on the findings.  Later you can also run just reports against previously completed scans.

This is pretty much all you need to do for the basic setup. Feel free to run more scans and try to run a credentialed scan as they will provide the most comprehensive vulnerability information and its also least intrusive on your target systems.

Until next time!

Tagged , , ,

Physical Drive Image With Plugable USB Hub

The other day I was trying to image a physical 250GB desktop hard drive using FTK Imager but I continued to get the following error under status: Failed: The specified network name is no longer available. This was the first time that I received this error so first I was not sure what caused it. Here was my setup:

The error was little random in that it would fail at different places – anywhere between 2% – 13%. My first thought was that the docking station was bad; so I took out my WiebeTech write-blocker and attempted to image the drive again. But I received the same error at 6%. At this point, I knew that the docking station was fine and that the problem had to be with either the FTK Imager software, Windows Server 2012 (my first time using Server 2012 during imagining) or the USB hub. I decided to start with the hub; I unplugged the docking station from the hub and connected it directly to the server’s USB port – skipping the hub completely. I started FTK Imager and began the imagining process – and to my surprise, the imaging completed without any errors!

From the 7 ports provided by the hub, only one port was being utilized (connected only to the docking station) eliminating the possibility of the overwhelmed hub. In fact, the hub worked fine when I copied large operating system .iso files from an external hard drive to the server. So, I am not sure where the problem is the hub but in this situation, I was unable to image a relatively small hard drive due to this hub.

Tagged , ,

Support For Your Anti-Virus

A few months ago I published two blogs about having additional layers of security for your home computers. You can read them here: part 1 and part 2. The goal of those two blogs was to first bring awareness – using my personal experience around how we simply cannot rely on anti-virus software to protect our personal computers. And second to demonstrate how effective some free browser extensions are in reducing unwanted and potentially malicious programs from downloading in the background without much of our knowledge or interaction.

This blog is not exactly a continuation of the other two but it is definitely related. While in the previous posts I focused on free extensions, however in this post I want to talk about an application that is though not free but definitely worth looking into.

The EXE Radar Pro application from NoVirusThanks group (besides this particular software this group has a bunch of free and extremely useful online utilities that I have been using for sometime and you should check those out too!). As far as the EXE Radar Pro goes – it is for $19.99 with the option to try free for 30 days. They do a pretty straightforward job explaining what the software does so I won’t waste time repeating what is already there. Instead, I will briefly explain my experience with this software; both the pros and cons.

First the pros: the software is easy to install and seems to get to work immediately. There isn’t a lot of configuration or overly complicated interface that you need to worry about; it simply sits in your windows tray and all of the management is done by selecting the tray icon. Some of the more specific features that I like about this software is that I think this is the closest that you can get to an enterprise level endpoint monitoring software for such a low price. The software pretty much tracks all the running system processes, the associated parent process, and monitors as new processes start. You also have to the ability to tag processes to either a blacklist or a whitelist based on what you think should be allowed or blocked. The software does prompt you when it thinks a suspicious/unknown process is trying to run. I believe some of the basic checks that it does to determine a good from a bad process it by simply checking if the process itself is digitally signed and if the process is making any specific/unusual command arguments. In fact, it presents all this information on the prompt dialog:

EXE Radar Pro - Prompt Alert


From the dialog above you can simply choose to allow, block or use the drop-down arrow to add the process to either the white/blacklist.  While the above dialog box is well designed and self-explanatory – I also experienced some annoying cons with this dialog. For example, when you are prompted with the dialog box you do not have the option to ignore it. You can move it around the screen to get it out of the way but you have to make the decision to either allow/block. In addition, until you make your selection – you will not be able to execute another process. For example, when the above prompt came up on my screen and I wanted to take the screenshot using the Microsoft built-in snipping tool – I was not able to because the snipping application would not execute until I made my selection in the dialog box (I was able to do it using the keyboard print screen key).

The second major con that I experienced is that on each boot of the system there would a half-dozen prompts that I had to go through before the system would be fully up and functional. I understand that there is some learning that is involved in the beginning of the software but even after two weeks and several whitelisting, I would still receive numerous prompt during startup. And as you can imagine, when you are trying to get something done quickly – these prompt becoming irritating. In fact, one of the applications that EXE Radar Pro did not like in particular was Splunk. Well before I downloaded EXE Radar Pro – I had the Splunk Free installed on the computer to do basic log analysis. But when I installed EXE Radar Pro – I would constantly get prompts. Eventually, I became irritated and ended up uninstalling Splunk from the system. In fact, even during the uninstall process of Splunk, I had to hit Allow at least 8 times before the uninstall process completed.

Overall, EXE Radar Pro is a good software for personal use because it provides that additional layer of protection and control around what runs in your system. I would say that while the interface is simple and self-explanatory – an average user may not appreciate the frequency of the prompts, the technical details and the decision making that would be required. On the other hand, if you like to have such visibility and control of your system then for $19.99 you cannot go wrong with this software!


Tagged , ,
Advertisements