Category Archives: Malware

APT41’s Dodgebox: Defense Evasion and Detection Strategies

While conducting threat hunting research, I came across a defense evasion behavior in APT41’s Dodgebox malware that I haven’t seen formally documented as its own technique in MITRE ATT&CK. This post walks through what I found, why it matters, and how to detect it.

The Technique

Dodgebox checks whether Control Flow Guard (CFG) is enabled on the system, and if it is, attempts to disable it.

CFG is a security feature built into modern Windows systems that restricts where an application can execute code. It’s designed to make it harder for attackers to exploit memory corruption vulnerabilities, like buffer overflows, to hijack control of a running program. When CFG is bypassed, an attacker significantly improves their odds of successful code execution and privilege escalation.

According to Zscaler’s ThreatLabz research on Dodgebox, the malware detects CFG status and, if active, modifies the LdrpHandleInvalidUserCallTarget function in ntdll.dll to disable it, effectively removing that security layer before proceeding.

Reference: Zscaler ThreatLabz, DodgeBox: A deep dive into the updated arsenal of APT41

Where This Sits in ATT&CK

This behavior maps cleanly to Defense Evasion, and specifically to the Disable or Modify Tools technique (currently T1685 in ATT&CK’s structure, previously catalogued under T1562.001). ATT&CK already documents APT41’s broader pattern of in-memory patching of security interfaces like AMSI and ETW inside ntdll.dll to evade detection without triggering obvious service termination events. The CFG check-and-disable behavior is consistent with that same pattern, but as of this writing, I haven’t found it documented as its own procedure example under any current sub-technique.

Worth noting separately: before disabling CFG, the malware first has to determine its status. That discovery step is arguably its own consideration, closer to System Information Discovery, and shouldn’t be conflated with the disable action itself.

Detection

    There are a few practical ways to check CFG status and hunt for this behavior.

    1. PowerShell – Per-Process Check
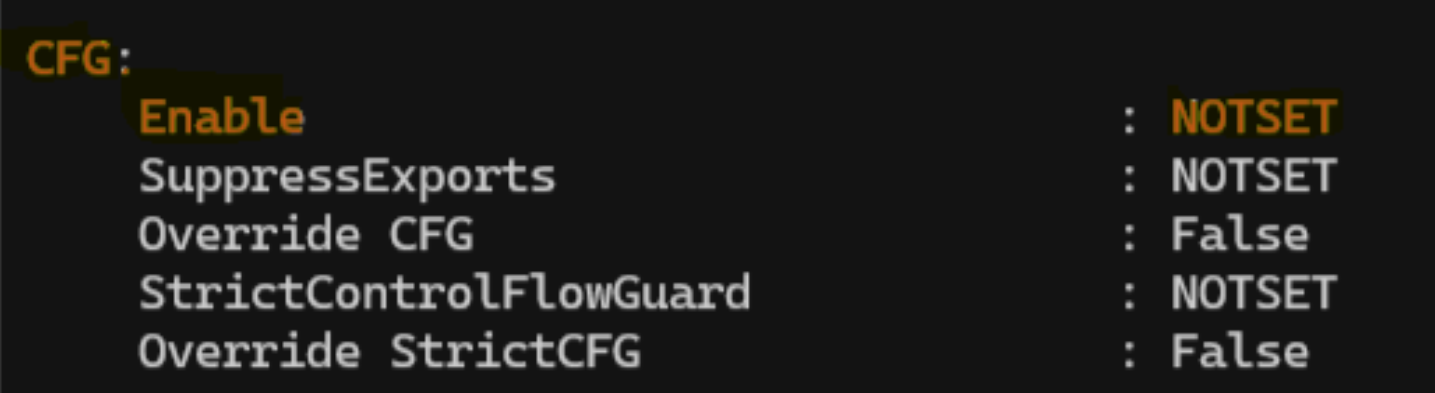
      • Get-ProcessMitigation lets you query the mitigation settings of a running process, including whether CFG is enabled:
        • Get-ProcessMitigation -System
      • If the result shows OFF, CFG is not enabled for that process. ON or NOTSET indicates CFG is enabled or set to the default configuration.
    2. PowerShell – Binary-level Check Across Systems
      • Get-PESecurity is a PowerShell module that examines Windows binaries to determine whether they were compiled with various security mitigations, including CFG. The relevant characteristic is stored as GUARD_CF with a value of 0x4000, which makes it possible to check for CFG support at the binary level rather than just the running-process level.
    3. EDR – Fleet-wide Check
      • If you’re running Microsoft Defender for Endpoint, Advanced Hunting can assess CFG status across your environment:
        • DeviceTvmSecureConfigurationAssessment
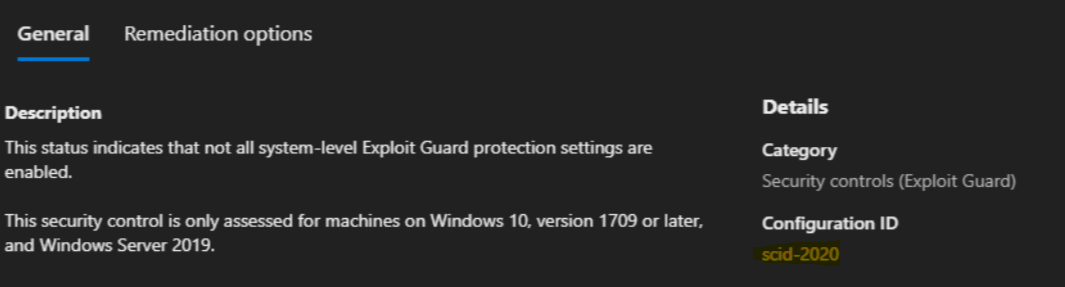
        • | where ConfigurationID == "scid-2020"
        • | project DeviceName, OSPlatform, IsCompliant, Context
        • | join kind=leftouter (DeviceInfo | project DeviceName, PublicIP, IsAzureADJoined) on DeviceName
        • | summarize count() by IsCompliant, OSPlatform
      • This gives you a fleet-wide compliance view rather than a single host check, which is more useful for spotting systems where CFG has been disabled outside of normal configuration management.
    CFG Status
    SCID-2020

    If your organization has visibility into CFG status at scale, whether through EDR telemetry, binary analysis, or process mitigation checks, it’s worth adding to your detection coverage. This is a small, quiet step in an attack chain, but it’s also a step that’s currently easy to miss.

    References

    Tagged , , , , ,

    How Free Web Filtering Software Can Protect You System?

    Update

    On August 1, 2016, Blue Coat, Inc. (K9โ€™s parent company) was acquired by Symantecโ„ข. As can be imagined Blue Coat and Symantec had a handful of similar products and unfortunately, it didnโ€™t make sense to maintain two competing products. it was decided to โ€œend-of-lifeโ€ K9 Web Protection.
    Effective immediately, K9 Web Protection is no longer available for purchase or download. Technical Support for K9 will end on June 30, 2019.

    It is unfortunate to see K9 Web Protection go. I am not aware of an alternative free software that provides the same level of protection at a premium quality. However, for those interested in alternatives to K9 Web Protection, I would recommend you can start with Quad9 and OpenDNS Home. While neither of them provides everything that K9 did, but they still protect your system against most common online threats.


    โ€œWe may think one layer of security will protect us โ€“ for example, antivirus. Unfortunately for that approach, history has proven that, although single-focus solutions are useful in stopping specific attacks, the capabilities of advanced malware are so broad that such protections inevitably fail.โ€ โ€“ Jerry Shenk, Layered Security: Why It Works.

    Making use of layered security for personal use is of the utmost importance as I have covered a couple of times in the past: here, here, andย here. Just as I have done in the past, I will use this post to share another tool that you can explore to support your personal layered security strategy.

    My never-ending curiosity to explore and test new technologies can sometimes lead me to stumble upon genuinely impressive solutions. Fortunately for you, I believe this tool falls into that category.

    K9 Web Protection is the software that I have been testing for some months now, and I must say, Iโ€™ve been truly pleased with its results. The software falls under the Web Filter category, which places a restriction on websites that you can visit. Web Filtering is used in two major cases. The first is to permit parents to control the sort of content accessible to their children, offering their kids a safe environment to learn and explore online. The second is for businesses who wish to prevent their employees from accessing websites that do not pertain to their jobs.

    However, in addition to the above-mentioned, from my experience using this software on a daily basis, I have come across other benefits:

    • Real-time malware protectionโ€œhelps identify and block illegal or undesirable content in real time, including malware-infected sites. You also benefit from the WebPulse cloud service, a growing community of more than 62 million users who provide more than six billion real-time Web content ratings per day.โ€
      • You can learn more about web filtering and intelligence here.
    • Automatic content ratingsโ€œNew websites and web pages are created every minute, and no one person can possibly rate or categorize all of them. To ensure protection against new or previously unrated websites, Blue Coatโ€™s patent-pending Dynamic Real-Time Ratingโ„ข (DRTR) technology automatically determines the category of an unrated web page, and allows or blocks it according to your specifications.โ€

    Another advantage of the K9 Web Protection is that it is backed by Blue Coat (acquired by Symantec in 2016), ย the leader in Web Security โ€œwith an impressive portfolio of integrated technologies serving as a trusted platform to deliver Cloud Generation Security to more than 15,000 customers worldwide.โ€

    This solution is truly an โ€œenterprise-class security software designed for home computers.โ€ Also, did I mention that itโ€™s free! โ€œAs part of the Blue Coat Community Outreach Program, K9 Web Protection is free for home use. You can also purchase a license to use K9 Web Protection for business, government, non-profit, or other use.โ€

    I will do a quick overview of the installation and usage of the software, but you can find a well-documented quick start guide and user manual here:

    Installation and Usage Overview:

    installk9

    • The installation process should take a couple of minutes to complete as it is self-explanatory.
    • Upon completion, the applicationโ€™s interface will open in your browser:

    K9_Browser_admin_page

    • To view or modify any of the configurations, you will be prompted to enter the password you created during installation.
    • Here are some of the options and details you can access from the Setup page:

    k9_block_categories.PNG

    • Web Categories to Block: choosing one of the available levels allows you to block selected categories of websites.
    • Time Restrictions: 3 options are available to block web access depending on the time of day. Unrestricted places no restrictions on web access. NightGuard blocks all web access during contiguous blocks of time every day. Custom enables you to choose days of the week and time periods to block all web access.
    • Web Site Exceptions: Allows you to create lists of websites to โ€œalways blockโ€ or โ€œalways allow.โ€ Blocking Effects: โ€œBark When Blockedโ€ plays a barking sound when a web page is blocked. Make sure the sound is enabled and not muted. Show Admin Options displays options on blocked web pages which enable administrators to view the blocked web page. Enable Time Out allows you to block all web access if too many web pages are blocked in a given period of time
    • URL Keywords: Allows you to enter keywords which, if found in a URL, cause a โ€œblock pageโ€ to display. Safe Search: โ€œRedirect to K9 Safe Searchโ€ will redirect searches to various search engines through K9’s Safe Search. This provides a safer search experience than other search engines provide. Force Safe Search will prevent users from disabling Safe Search functionality provided by various websites.
    • Other Settings: โ€œUpdate to Betaโ€ enables you to get advance copies of new K9 Web Protection software undergoing development. Blue Coat distributes Beta versions so that K9 gets used in “real world” environments before being released as a final version. Please note that Beta versions might be incomplete and less stable than final versions. โ€œFilter Secure Trafficโ€ enables K9 to block secure websites (i.e. sites that use the HTTPS protocol).
    • Password/Email: Allows you to change your K9 administrator password or e-mail address.
    • K9 Update: Installs software updates if available.
    • View Activity Summary: This tab shows a summary of all โ€œWeb Activityโ€ on your computer: To view more details, click the โ€œCategoryโ€ or โ€œRequestsโ€ links. On these pages, you have the option of grouping the data by month or by day. To view Administrative Events details, click the โ€œView Allโ€ link. (Some of these activities are as a result of automatic browser and toolbar updates, for example, and might display URL formats with which you are not familiar.) By selecting “Clear Logs”, all your activity data will be cleared; however, three daysโ€™ worth of administrative events will be retained.k9_activity_summary

    As you can see from the above, the information provided here is extremely granular and it allows you to not only get an easy view of your browsing behavior but also the behaviors of the various system and application components. I have been using this solution in conjunction with other traditional protective mechanisms, such as anti-virus, and the benefits have been massive.

    For instance, sometimes, while surfing the internet, I would see a certain URL get blocked or a visit history to a certain category in a website without a recollection of visiting that website. However, after investigations, I found that some components of a software installed on my computer or an extension in my browser is the reason behind that activity.

    โ€œThe malware ecosystem has changed drastically in the past 10 years, to the point that the old precautions are just no longer enoughโ€ –ย Malwarebytes LABS.ย I have been using K9 Web Protection on many of my personal computers because I have been impressed with it, so I thought to share it here. I believe it provides that extra layer of protection that we can all appreciate in a world where cyber threats are on the rise. In addition, I believe this solution is a wonderful option for those that are less familiar with common cyber threat vectors (i.e. parents) and can easily fall for phishing emails or click on an adware as they browse the internet.

    As we have known for some time, โ€œthere is no single solution for the information security problems we face today. A combination of many different kinds of security tools is required to protect you from modern threatsโ€ฆโ€ and I believe K9 Web Protection is among the best tools we have today, so you should definitely equip yourself with it if you are going to create a safe web environment for yourself, your kids, your employees, and everyone around you!

    ย 


    Tagged , , , , , , , , ,

    Free IDS and Full Packet Capture Software

    Recently, I have been involved in configuring an Intrusion Detection System IDS (IDS) with full packet capture using the SecurityOnion distribution (distro) in the production environment. Previously, I had set up a SOHO IDS environment when I was learning during the first Compromise, Detect, and Respond (CDR) project. But that IDS deployment was done using a different distro and it also did not have the full packet capture capabilities. So to better familiarize myself with SecurityOnion, I decided to do a quick post about it.

    Just in case you are not familiar with SecurityOnion, you can check out their awesome page here. I am not going to try to explain much about the distro itself because my explanation will not do it enough justice. Besides, their website has a whole lot more information than I can provide. They do a great job of explaining how you can start from scratch and have a system up and running in no time. They even go over how you can customize it for your specific environment and maintain the system going forward.

    I followed the installation steps here and the post-installation guide here and within an hour, give or take, I had the IDS up and running (including the time it took to download the 1.3GB ISO image over my home connection). And just like my previous labs, the whole setup here was very simple: I used my laptop’s VMware Workstation for the SecurityOnion. I placed the network interface in promiscuous mode to capture traffic from the host. Note: this method typically results in a significant packet loss, however, it is fine for just practice.

    NETWORK PROMISCUOUS MODE

    Enabling and verifying promiscuous mode configuration

    After finishing the IDS configuration, my Snorby screen looked like the above. You will notice that there isn’t much activity here compared to what we saw during the first CDR project. The main reason for this is that in the previous setup we had Metasploit running and had been running exploits, but this setup is a vanilla setup. Nevertheless, it’s pleasing to be able to get basic IDS up and running easily and quickly.

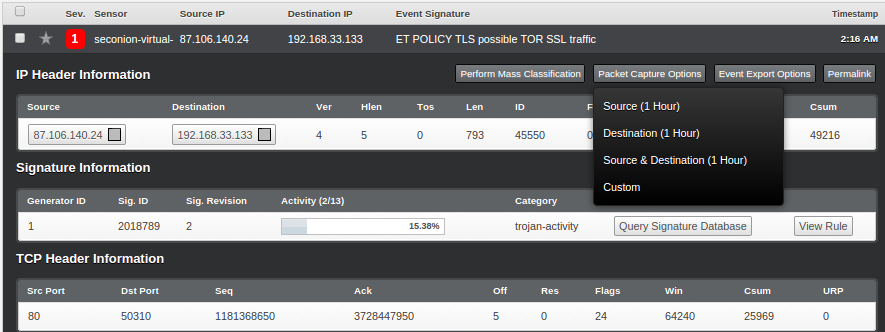
    So, in order to generate some interesting IDS alerts, I set up TOR in my test environment, and as you can see, it has triggered some high severity events:
    Sample Alert

    Now we can select any of the above alerts to view the packet details. Here are the steps for that: Select the event that you want to analyze > Select “Packet Capture Options” on the top right-hand corner > select “Custom” and then “Fetch Packet“.

    Packet Analysis

    After you have completed the above steps, you will be presented with a new page: “capME!”

    CapME

    After logging into the new interface above, you will be able to view the assembled packet behind the event. Pretty cool, huh?!

    But our IDS interface is only displaying events that have someย potential malicious behavior associated with them. However, there are a whole lot of packets stored in the back end of our SecurityOnion server that we can review via the following path: /nsm/sensor_data/seconion-virtual-machine-eth0/dailylogs:

    DailyLogs

    You will now see logs broken up into multiple files. Depending on the volume, you may see several files for each day. In my case, there are only two files (2014-11-27 is the latest and has the most amount of data).

    We can open the snot.log.xxxxxxxxx file using a number of tools, e.g. Wireshark, TCPdump, SiLK, Netwitness, etc. I opened mine using Wireshark (depending on the file size and your machine’s power, this may take some time).

    TOR traffic was definitely the loudest, making up most of the logs:

    Encrypted Traffic

    And when we try toย reassemble it, this is what we get:

    TCP Stream_Encrypted

    Enabling and verifying promiscuous mode configuration

    But by looking at the Protocol Stats, we notice that there is a bunch of other traffic in this capture as well:

    Traffic Protocol Statistics Wireshark Protocol Hierarchy ]

    Now, we will do some SiLK kung-fu and see what we can pull out of this capture.
    The first step is to open the snot.log.xxxxxxxxx file using Wireshark (or any similar tool) and save it as a new .pcap file. In the second step, I used SiLK’s rwp2yaf2sillk to convert our newly created .pcap file into flow format.

    # rwp2yaf2silk –in=1417046408.pcap –out=1417046408.silk

    Now, we will go through the basic analysis on our capture using various SiLK commands.

    5 largest senders of bytes of data:largest-senders

    5 TCP connection per source and destination IP:5-tcp-connections

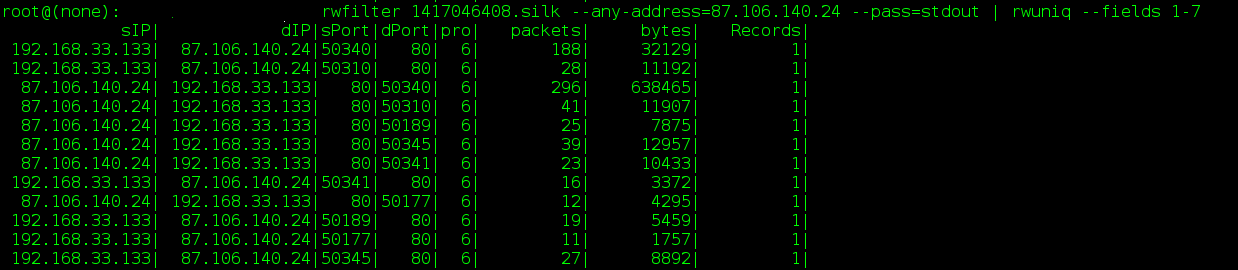
    Show all records from the capture with either a source or destination IP of TOR:specific-ip-find

    TCP flows with a source IP of our VM and determines the top 5 destination ports by the number of flow records:top-5-destination-ports

    Per above output, the majority of our destination ports are 443, with the second largest being port 9001 with 15 total records. Let’s see the amount of data associated with this port:unique-port

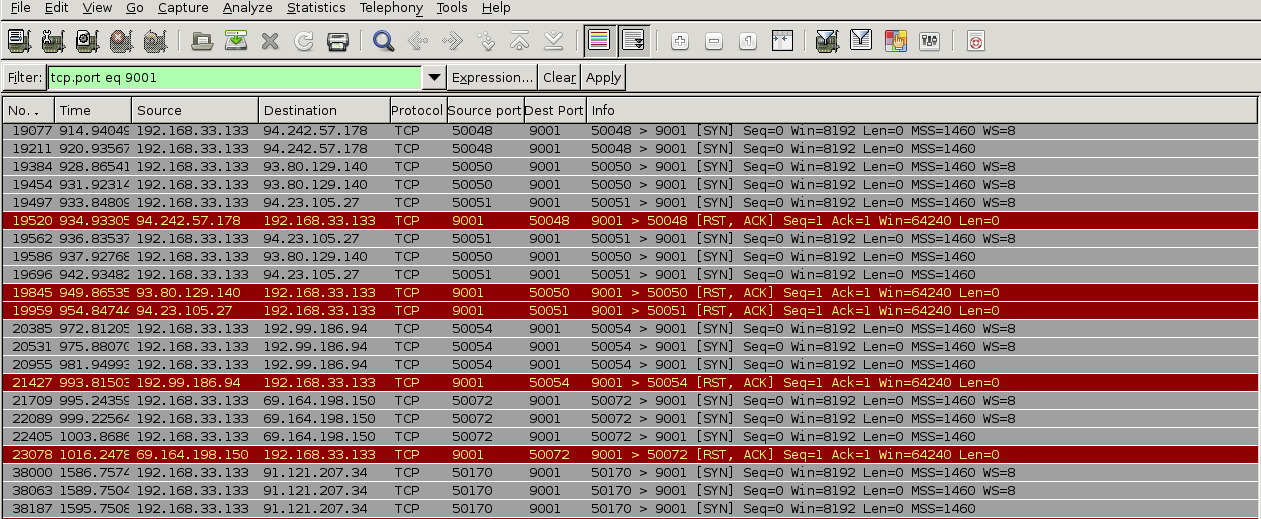
    Now, as the last step, we will go back to Wireshark and see if we can find the data that is going to port 9001:TCP Port eq 9001Based on the above, it seems like the traffic generated on port 9001 (default TOR port) are simply connection synchronization attempts followed by erupt connection resets.

    Anyway, this concludes my quick walk through on setting up IDS with full packet capture using the SecurityOnion distro.ย  If you are looking for a great IDS and Full PCAP solution on a shoestring budget, this is it!

    Tagged , , , , ,
    Advertisements